Visual Studio Code (aka, VS Code) is a lightweight IDE developed by
Microsoft. It is an open-source, cross-platform and free development
tool; it's popular because of its extensible and adaptable behavior. As
per the different studies, VS Code is a dominant developer tool among
all the web development IDEs.
VS
Code has great support for .NET Core application development,
deployment and debugging. In this article, we’ll explore to use
nopCommerce application using VS Code. nopCommerce is an open-source
e-commerce platform built with the latest technologies.
In case you're new to nopCommerce, head over to nopCommerce.com to learn more.
Install Extension
C#
support is optional in VS Code, hence we need to add C# additionally
using an extension. Download and install C# extension from the Visual Studio marketplace, or you can directly install it from VS Code itself by searching for "C#" using the extension view window (Ctrl+Shift+X).
This
extension provides C# editing support, syntax highlighting,
IntelliSense, go to definition and find references, etc. These are
indeed required features to develop an application.
Load nopCommerce source code and run the project
Open
up the terminal at the code directory and execute the command [code .],
it will open the VS Code and load the current directly into it.
.NET
Core commands can be executed anywhere in the computer using Command
Prompt, PowerShell or other terminals. However, VS Code provides
terminals internally, so you don't have to back and forth between
terminal and IDE while development.
To open a terminal, go to the Terminal menu on the top and select an option for a new terminal (Ctrl+Shift+`).
Nop.Web
is the entry point of a nopCommerce application, hence to run the
project we need to run the Nop.Web.csproj file. To do that, change the
current directory to src > Presentation > Nop.Web and run the
command [dotnet run].

The web project now starts running; open up a browser and hit the URL appeared in terminal logs. Provide a database connection and install your store.
Set Build and Debug Configuration
VS Code should prompt you to add the missing assets to build and debug your app, select Yes.
Set Build and Debug Configuration
VS Code should prompt you to add the missing assets to build and debug your app, select Yes.

On the off chance that it doesn't prompt any notification, you can always generate assets using the following step.
Go to View > Command Palette and type ".NET: Generate Assets for Build and Debug" select option and it will generate the required files.
Go to View > Command Palette and type ".NET: Generate Assets for Build and Debug" select option and it will generate the required files.

VS Code should then ask to choose the launch project, select Nop.Web project.

That will create a new folder named .vscode at the root directory including two files—launch.json and tasks.json.

These files contain configuration settings to debug and run the project, let’s review the launch.json file.
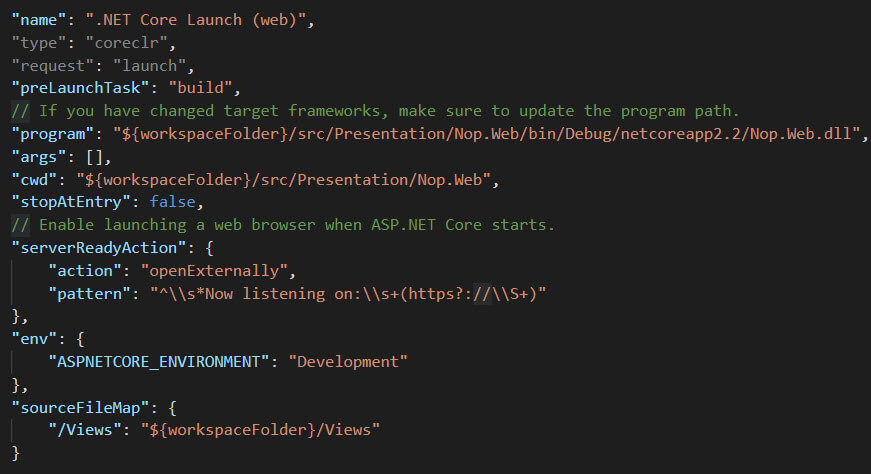
Here are the few essential configurations that we need to understand.
| Configuration parameter | Description |
| preLaunchTask | The task to run before the debug session starts. This will execute a task written in the task.json file. |
| cwd | Path to the working directory of the program being debugged. |
| program | Path of the executable file to launch the project. In our case—Nop.Web.dll |
| serverReadyAction | Act upon a URI when a server program under debugging is ready. |
| env | Environment variables passed to the program. |
To know more, hover on properties, a tooltip will display the description of each of those.
Debug the source code
Debugging is an essential requirement while developing an application. VS Code also provides a seamless debugging facility.
Go
to the debug menu at the left-hand side, select .NET Core Launch(web)
and click on the start icon to start the debugging. These options are
reflected from the launch.json file we have configured before.

It will load the project in a new window of your default browser, and you can see all the necessary information for debugging on your VS Code screen.

However, that isn't a convenient way for many of us to build every time after changes as it's a time-consuming process. To solve this problem ASP.NET Core provides in-built file watcher. The watcher keeps an eye on files changes and helps to continuously build the project to speed up the development cycle. This will reduce your effort as well, just make a change, wait for a few seconds, and refresh the web page, that's it!
To run the project with the watcher, use the command [dotnet watch run].
Project is now running in the watch mode, let’s modify the code and save the file. The watcher will detect the file change, automatically then stop and starts the application again.
To run the project with the watcher, use the command [dotnet watch run].
Project is now running in the watch mode, let’s modify the code and save the file. The watcher will detect the file change, automatically then stop and starts the application again.

As Nop.Web project has multiple dependencies, it will take a bit more time, afterward refresh the page and you should see the changes there.
Add Code Snippet
Snippets are helpful to speed up the development. In the VS Code, we can add our snippet with just a few easy steps.
Go to File > Preferences > User Snippet, and select C# from the list; it will create a JSON file (csharp.json) with a boilerplate template.
Add Code Snippet
Snippets are helpful to speed up the development. In the VS Code, we can add our snippet with just a few easy steps.
Go to File > Preferences > User Snippet, and select C# from the list; it will create a JSON file (csharp.json) with a boilerplate template.

Add the following code to the csharp.json file.
Things to notice:
- pluginSnippet: Name of the snippet.
- prefix: The prefix to use when selecting the snippet in IntelliSense.
- body: Snippet with variable names to be added when the user enters the prefix.
- description: Snippet description.

Debugging JavaScript
We
have set up a project for the server-side debugging; however,
development is required to debug the js files. To enable JavaScript
debugging, we need to add another extension.
Go to the extension menu and search for “Debugger for Chrome” and install it.
Then, go to the debug menu, left-hand side, open the debug configurations and select the option "Add Configuration".
The launch.json file will open up and will
display various options to add a new configuration, select "Launch
Chrome". As js file location and the port number are different, we need
to modify the newly added configuration as follows.
"configurations": [
{
"type": "chrome",
"request": "launch",
"name": "Launch Chrome",
"url": "http://localhost:55390",
"webRoot": "${workspaceFolder}/src/Presentation/Nop.Web/wwwroot"
},
...
..
{
"type": "chrome",
"request": "launch",
"name": "Launch Chrome",
"url": "http://localhost:55390",
"webRoot": "${workspaceFolder}/src/Presentation/Nop.Web/wwwroot"
},
...
..
Now you can see chrome launcher in the debugger list, select that and click on the run.

It will open up a separate chrome window with a specified project URL, however, you couldn’t see the project is running on a browser. To load it on a browser, run the project from another terminal. Then, refresh the chrome window opened from the VS Code. Put the break-point in js file located in wwwroot folder. And you should see the breakpoint gets hit.


Remember
- C# extension: Being used for C# and .NET Core build, debug, syntax highlighting, etc.
- launch.json: Build and Debug configurations
- Debugger for Chrome extension: To debug JavaScript files.
- User Snippet: Custom snippet to make development faster.
- Watcher: Automatically build the project after making changes.
NopCommerce Hosting Recommendation
HostForLIFEASP.NET
receives Spotlight standing advantage award for providing recommended,
cheap and fast ecommerce Hosting including the latest NopCommerce.
From the leading technology company, Microsoft. All the servers are
equipped with the newest Windows Server 2012 R2, SQL Server 2014,
ASP.NET 4.5.2, ASP.NET MVC 6.0, Silverlight 5, WebMatrix and Visual
Studio Lightswitch. Security and performance are at the core of their
NopCommerce hosting operations to confirm every website and/or
application hosted on their servers is highly secured and performs at
optimum level. mutually of the European ASP.NET hosting suppliers,
HostForLIFE guarantees 99.9% uptime and fast loading speed. From
€3.49/month , HostForLIFE provides you with unlimited disk space,
unlimited domains, unlimited bandwidth,etc, for your website hosting
needs.


0 comments:
Post a Comment